Getting a Vintage Nine Patch Ready to go to the (machine) Quilter
- Holly Reynolds
- Oct 18, 2024
- 5 min read
Updated: Oct 19, 2024

I adore everything about the color and pattern vintage of cotton sack fabric, so of course this sweet nine patch quilt top caught my eye! I found this machine sewn top during the Roundtop Antiques Show. It was at a dealer's booth at Blue Hills. The dealer didn't know the history of the top.
I came to a standstill in front of the top and mulled over what I could do with it. I clearly liked it, but the price was high. (Blue Hills is not the place for a bargain. Go to the Warrenton fields for bargains.). I left the booth and thought it over.
So the things I had to decide were
1. if a vintage top was worth the price and work to me and
2. did I care if the quilt police minded machine quilting?
So clearly I loved the fabrics, it was in great shape, and let's face it, as time goes by fewer of these quilts will exist. That made it valuable to me.
As for the quilt value police who only want handquilted quilts, they can have a voice when they have actually handquilted a quilt. If you are a handquilter who doesn't approve of machine quilting shenanigans, you are probably going to want to stop reading now.

I figure that the original maker of the quilt wanted it to be finished, right? So if after decades of existing as a UFO (unfinished object), what if I'm the only person who comes along willing to finish their quilt? I think the original maker would be happy for the quilt to be finished.
I decided to save the quilt. In fact, I found a lot of unfinished quilt projects that I snatched up at Roundtop. Here are the pieces I came home with.


How to save a vintage quilt top in good condition
Step 1 Fix anything that's falling apart
Check the top for any places the piecing is coming apart. Hopefully you can easily stitch any loose pieces at this point. If you have fraying, evaluate whether a zig zag stitch could control the fray or if you will need a patch. If you need to patch, you can add a similar fabric or tulle in front of or even behind the damaged piece.

Step 2 Handwash
Handwash with a gentle soap if needed. Rinse. If you notice any dye bleed, take care of that as mentioned in my post about the Lone Star quilt.
Step 3 Soak in a Vintage Fabric cleaner
Soak in a cleaner designed for aged fabrics, like Retro Clean. Get it here https://amzn.to/4dScx1t
Cleaners like this have a different chemical makeup than regular detergents, so they are worth the price. (note: see gross water pics in Lone Star post. This is what Retro Clean removed after a 2 rinses and a soak in gentle detergent.
**Fine. I’ll add the gross water pic at the very bottom of this post, but scroll down at your own risk!
Rinse with cold water. I do this in a large sink basin or even a non-porous bathtub. If your fabric needs a second soak, repeat.

Step 4 Air Dry
If you have a nice clean patch of grass to lay the quilt out to dry, do that. Seriously. The chlorophyll is supposed to help whiten the fabric. The neighbors probably think I'm crazy when they see quilts laying out to dry in my front yard. If you don't have access to grass, drape it somewhere to air dry. I sometimes use the side of my tub when fabric is drippy.
Step 5 Iron & Cut Strings
Iron the quilt top, checking again for places where the piecing might be coming apart. Mend if needed. Trim away any strings on the back so they don't accidentally show through after quilting.
Step 5 1/2 Border
If your quilt seems a little small, add a border all the way around with a harmonious new fabric. Again, quilt police against mixing old and new don't get a voice unless this quilt is going to cover them.

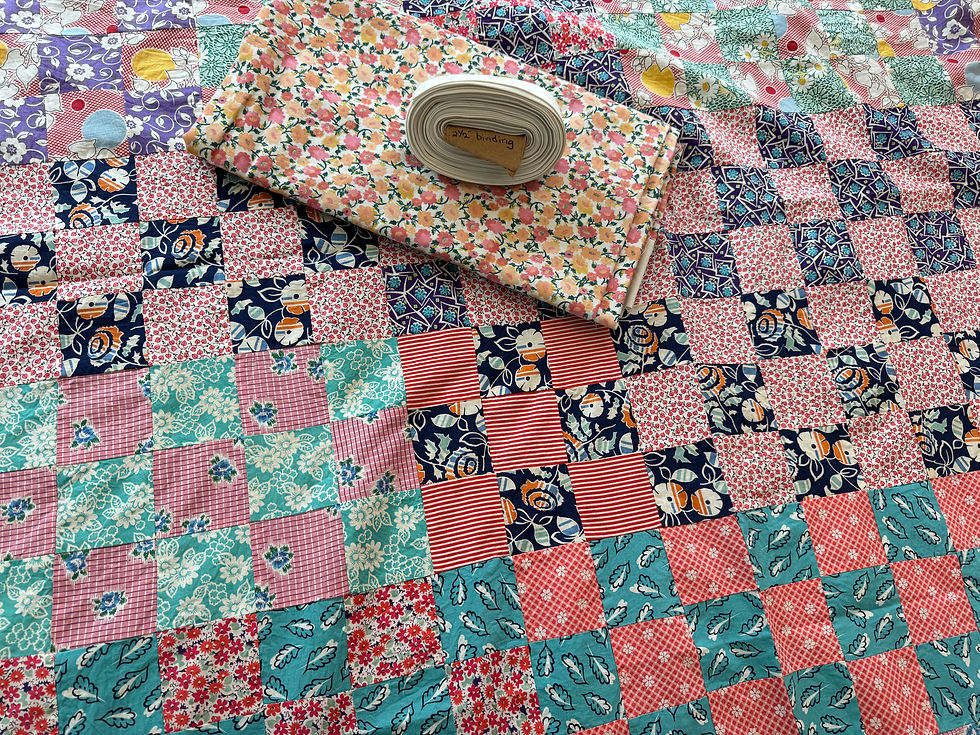
My quilt top was small, so I added a 3" border of a nice creamy cotton I had. I went with 3" so that with seam allowances, the border would end up the same width as the 2.5" squares.
Any fabric you add to the quilt should match in color and style.
Look for vintage fabric or reproductions.
My quilt top with added border measured 59" x 49.5", which is roughly 5' x 4'. It's still small. If you are making a bed covering, add enough border for your bed size.

I keep my small quilt tops in jumbo ziplock bags if I am going to take them to the store (to pick binding/backing) or the quilter. Write the dimensions on the plastic bag, along with your name and contact info. Get these 2.5 gallon bags here https://amzn.to/4dNEx6k
The 2.5 gallon size works great for keeping your fabrics together while you gather the fabrics you want for your next project.
If you have a larger project, Ziplock has 10 gallon zipper bags here

Step 6 Binding and Backing
If you use the Robert Kaufman quilting calculator app, you can easily figure out how much binding and backing you will need once you enter the quilt top dimensions. Write that on your bag if you are going to the fabric store.
For my binding I used the same creamy fabric as my border. I like 2 1/2' wide binding, and I roll it around a bit of cardboard. I labeled it with the width just for the quilter's convenience.
For my backing I used a sweet little floral sheet. Yes, a sheet. You should totally check out discount cotton sheet sets for backing!
Your machine quilter will want the backing to be 4-6" larger than the top on each side.
Laura Ashley has sweet flannel floral sheets here https://www.amazon.com/dp/B00LZKCKRK/ref=cm_sw_r_as_gl_api_gl_i_8PZ4KX0CTH0TF8ZDXS5S?linkCode=ml2&tag=happyquiltype-20

Step 7 Muslin liner for quilt top
My quilter recommended putting a layer of muslin under the vintage quilt top while it is being quilted. This is just for added durability for those old fabrics. If one were to get damaged, with a hole or tear, you could easily stitch it right back down to the muslin underlayer.

You could easily add any color underlayer to complement your quilt top. I had just gotten this fabric roll at a charity garage sale for $4, so that's what I'm using. Check out that width - 114'! After washing and ironing, I will cut it to the same size as my backing and include it in the bundle for my quilter.

It's ready to go be machine quilted now. At my quilter's I will choose quilting pattern, batting, and thread color. I prefer premium cotton batting. Then after she quilts it, I will have her put the binding on with machine stitching. I'll share the results soon!
Have questions? Check out the quilting bee forum!
This post contains affiliate links to make finding products easier for you. If you purchase through an affiliate link, your price won’t change, but I’ll get a small commission. Thanks for supporting the website!
Thanks so much for reading,
Holly


Love your finds!
If you ever want one hand quilted, there is an older group of ladies here who do handquilting. I have two tops that Kerry’s mom made that I’ve considered having them do but I’ve also had my long armer look at them to see if they could do them. I’m guessing they are close to 60 years old.